
There's nothing quite like reaching for a glass of iced tea on a warm day, only to find an empty ice bin. It’s a frustratingly common problem, but the good news is that it’s often something you can fix yourself without a service call. The culprit is usually a simple issue, like a clogged water filter or a frozen-in water line, which can bring ice production to a dead stop.
Before you jump to conclusions about a major mechanical failure, let’s walk through the most common reasons your ice maker might be on strike.
Diagnosing Common Ice Maker Failures in North Dallas
We’ve all been there—staring at an empty ice bucket on a hot Allen afternoon. But before you start picturing a hefty repair bill, it helps to know what usually goes wrong. Tackling a quick diagnosis yourself is the best first step to figuring out why your appliance has stopped working.
You'd be surprised how many ice maker issues are straightforward. Simple things, like the freezer temperature being off or a control arm getting jammed, can halt the whole process. For example, your freezer needs to be cold enough to make ice, but not too cold. If the temperature is set above 10°F, it’s too warm. If it’s set way too low, you risk freezing the water line and creating a blockage.
Initial Checks for Plano and Frisco Homeowners
The first places to look are often the easiest to fix. A quick visual inspection can tell you a lot about what’s happening inside your freezer. These first few steps are all about ruling out the simple oversights before you start thinking about more complex parts.
Here’s what to check right away:
- The Control Arm: Look for a thin metal bar, sometimes called a "feeler arm." It should be in the down, or "on," position. If it’s locked pointing up, the ice maker thinks the bin is full and won't make any more ice.
- Water Supply Line: Gently pull your fridge away from the wall and check the water line connected to the back. It's easy for this line to get kinked or crushed, cutting off the water flow.
- Ice Jams: Sometimes a single, oddly-shaped ice cube gets wedged in the ejector mechanism. This little jam can prevent the entire harvesting cycle from finishing.
To make this process a bit easier, here’s a quick checklist to run through. It covers the most common symptoms we see and points you toward the likely cause.
Ice Maker Quick Diagnostic Checklist
| Symptom | Potential Cause | First Action to Take |
|---|---|---|
| No Ice Production at All | Control arm is up, water supply is off, or the water line is frozen. | Lower the control arm. Check the water valve behind the fridge. |
| Small or Hollow Cubes | Low water pressure or a clogged water filter. | Check for a kinked water line. Replace the water filter. |
| Ice Maker Won't Stop | Control arm is stuck or the ice bin isn't positioned correctly. | Ensure the arm moves freely. Reseat the ice bin. |
| Water Leaking | Misaligned fill tube or a crack in the ice mold. | Make sure the fill tube is aimed into the ice mold. Inspect the mold. |
This table should help you quickly narrow down the possibilities. If you've gone through these checks and are still stumped, it’s time to look a little deeper.
Common Culprits Behind a Faulty Ice Maker
If the simple checks don't get things running again, the issue probably lies with a specific component. In all our years servicing homes across McKinney and North Dallas, we’ve found that a few parts are notorious for causing trouble.
A faulty water inlet valve is a frequent offender. This is the small part that controls water flow into the ice maker. If it fails electronically or gets clogged with sediment, the water can't get in—and no water means no ice.
Another common problem is a frozen-in water line. This happens when water freezes solid inside the small tube that fills the ice mold, creating a little ice dam. You might even hear the ice maker trying to cycle, but it can’t pull in any water.
Key Takeaway: Don't automatically assume the worst. A huge number of ice maker failures come from minor problems like a stuck control arm, an old water filter, or a frozen supply line. A methodical check of these basics can often solve the problem without needing a professional.
Our goal is to help you figure out if you're dealing with a quick fix or something more involved. Understanding these potential points of failure puts you in a much better position to troubleshoot the issue. For more complex problems, looking into more resources on refrigerator repair can offer a better sense of when it's time to call in a pro.
Getting to the Root of Your Ice Maker Problem
So you've done the basic checks and the ice bin is still empty. It's time to roll up our sleeves and dig a little deeper. Most of the time, when an ice maker suddenly gives up, it's not just a fluke; there's a specific mechanical or environmental issue at play. Getting to the bottom of it is the first real step toward a fix.
It's a story I hear all the time from homeowners across North Texas—one day you have a full bin of ice, and the next, nothing. The culprit is usually one of a few key parts that have to work together perfectly. When one goes down, the whole operation grinds to a halt.
Is Your Freezer Too Warm or Too Cold?
Believe it or not, the temperature inside your freezer has to be just right. It's a bit of a Goldilocks situation. If the freezer gets warmer than 10°F, the ice maker's built-in thermostat won't kick off the harvest cycle. This is actually a smart safety feature to prevent it from dumping a slushy mess into your bin.
On the flip side, setting your freezer to arctic temperatures can create a whole different headache. When it's too cold, the water line that feeds the ice maker can freeze solid. This is a surprisingly common problem, especially with newer fridges that use very thin water lines. You've essentially created a tiny ice dam that blocks water from ever reaching the mold.
How to Spot a Frozen Water Line
A frozen-in water line is one of the top offenders we encounter. You might even hear the ice maker trying to do its job, but if no water is getting in, you're not getting any ice out.
Finding it is usually straightforward. Take a look at the small fill tube, which is typically located at the back of the ice maker assembly. If you spot a chunk of ice blocking the opening or plugging up the tube, you've found your bottleneck. You can often thaw this out yourself using a hairdryer on its lowest heat setting, but be very careful—you don't want to accidentally melt any of the plastic parts nearby.
A Quick Word of Caution: Whatever you do, don't try to chip away at ice blockages with a screwdriver or anything sharp. It's incredibly easy to puncture the water line or crack the ice maker's mechanism, turning a simple thaw into a costly replacement.
The Three Most Common Points of Failure
Beyond frozen lines, the problem usually boils down to one of three main components. If any of these fail, your ice production stops dead in its tracks.
- The Water Inlet Valve: This little part is the gatekeeper, controlling water flow from your house supply into the fridge. It's an electronic valve that can get clogged with mineral buildup over time, or the solenoid that opens it can simply burn out. Either way, no water gets through.
- The Feeler Arm or Sensor: This is how the ice maker knows the bin is full. It might be a classic wire arm that gets pushed up by the ice pile or a more modern infrared beam. If this sensor fails and constantly signals "full," the ice maker will stop production for good.
- The Electronic Control Board: This is the brain of the operation. It's responsible for timing every step of the process—filling the tray, freezing the water, heating the mold to release the cubes, and pushing them into the bin. A fried control board means the whole system is offline.
It's not just your imagination; ice makers can be notoriously unreliable. Since 2014, survey data has shown that roughly 50% of all new refrigerators have had problems, and failing ice makers and dispensers consistently top the list of complaints. Some brands just seem to have more trouble than others, which goes to show that even high-end fridges aren't immune. For a closer look, you can check out this fantastic report on the most and least reliable refrigerator brands to see how they stack up.
Practical DIY Fixes for Your McKinney Home
When your ice maker suddenly stops working, it’s easy to jump to the worst conclusion. But before you panic and start pricing out a new refrigerator, take a breath. From my experience, most ice maker issues are surprisingly simple fixes you can absolutely handle yourself.
Let's walk through a few troubleshooting steps, starting with the easiest and most common culprits. Think of it as detective work. We'll rule out the simple stuff first, which often solves the problem without you ever having to pick up the phone for a service call.
First things first, get a good look at what's going on. This infographic shows the importance of clearing out the ice bin.
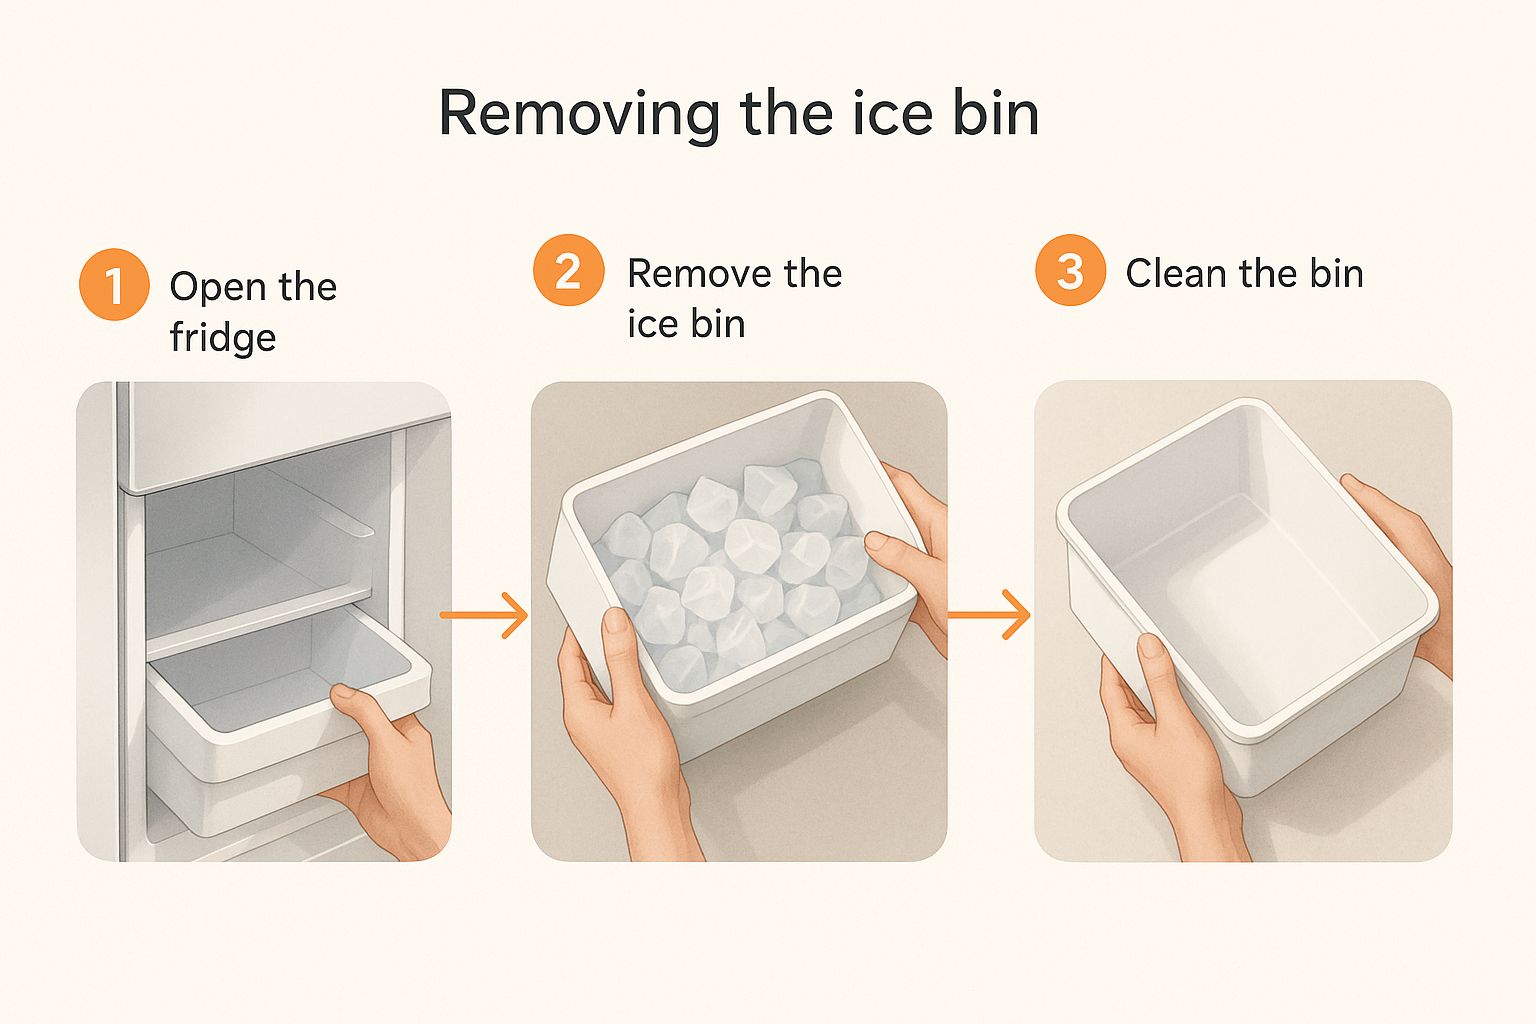
Removing the bin lets you see the ice maker’s moving parts clearly. You'd be surprised how often the issue is just a rogue ice cube jamming the mechanism or blocking the control arm.
Start With The Obvious: The On-Off Switch
I know, it sounds almost too simple. But you wouldn't believe how many service calls I've been on where the ice maker was just accidentally switched off.
Most units have a thin metal bar, called a control arm or feeler arm. Its job is to sense when the ice bin is full. As ice piles up, it pushes the arm up, telling the machine to stop making more. If someone was rummaging in the freezer for a frozen pizza, it's easy to knock that arm into the "off" position.
Check to make sure the control arm is in the down position. If you find it locked upwards, just gently lower it. Give it a few hours, and you might hear the satisfying sound of water filling the tray for a new cycle.
Check Your Freezer's Temperature Settings
Your freezer's temperature is a bit of a Goldilocks situation—it needs to be just right. For an ice maker to do its job, the freezer compartment should be set between 0°F and 5°F.
If the freezer is too warm, the ice maker’s internal thermostat won't get the signal to start a new cycle. On the flip side, if it's set way too cold, the water line can actually freeze solid before the water even makes it to the ice mold.
Take a look at your freezer's temperature setting and adjust if needed. Remember, after any adjustment, you need to give the appliance at least 24 hours to fully stabilize at the new temperature.
Pro Tip: Don't just trust the digital display on your fridge door. They can sometimes be inaccurate. I always recommend using a separate, inexpensive appliance thermometer placed inside the freezer for a true reading. It's a simple way to know for sure if the temperature is the real issue.
Inspect the Water Line for Blockages
The journey water takes from your wall to the ice tray is a common trouble spot. We see this all the time with customers in McKinney and the surrounding areas—a simple kink or ice clog can bring the whole operation to a halt.
Here's how you can safely check it out:
- Look for Kinks: Carefully slide your refrigerator out from the wall. Find the plastic water line that connects it to the water supply. Make sure it isn't sharply bent, crushed, or pinched behind the fridge, which can easily restrict water flow.
- Spot a Frozen Line: The small tube that actually shoots water into the ice mold is called the fill tube. It can get plugged with ice. You can usually spot it at the back of the ice maker assembly. If you see ice blocking the opening, you’ve found your culprit.
- Thaw it Out Safely: To melt the ice, first unplug the refrigerator completely. Use a hairdryer on its lowest heat setting and gently warm the frozen tube for a few minutes. A cloth soaked in warm water also works well. Never try to chip the ice out with a sharp object—you could easily puncture the line and create a much bigger problem.
After you've thawed the line, plug the fridge back in. It might take a few minutes for the system to reset, but you should eventually hear it call for water. If you want a bit more confidence, looking up a DIY ice maker fix can give you some great visual guides. These methodical checks really do solve most common ice maker headaches.
What to Do About Leaks and Strange Ice Maker Noises
It’s one thing to be out of ice, but it's another thing entirely when your refrigerator starts making strange noises or leaking water onto your kitchen floor. A puddle under the fridge or a sudden chorus of grinding and buzzing aren't just annoyances—they're red flags signaling bigger problems that need your attention right away.
Ignoring a leak, no matter how small it seems, is a recipe for disaster. It can quickly lead to warped flooring, ruined cabinets, and some seriously expensive water damage repairs. Those new, unusual sounds are often a cry for help from a component that's failing or under major stress, which could cause a total breakdown if you let it go.
Finding the Source of an Ice Maker Leak
Discovering water pooling around your refrigerator is enough to make any homeowner's heart skip a beat. But don't panic. The culprit is usually one of a few common issues you can track down yourself.
The first step is always to carefully pull the refrigerator away from the wall. You need a good, clear view of everything happening behind it, especially the water supply line, which is ground zero for many leaks.
Here's what to look for back there:
- Cracked or Damaged Water Line: That thin plastic tube feeding water to your ice maker can get brittle and crack over time. Run your hand along the entire length of the line, feeling for any moisture, drips, or obvious splits.
- Loose Connections: You have two main connection points: one at your home's water supply and another at the refrigerator's water inlet valve. Even a slightly loose fitting can cause a slow, persistent drip. Give them a gentle check to make sure they're snug.
- A Misaligned Fill Tube: Look inside your freezer. There's a small tube that directs water into the ice mold. If it gets bumped out of place, water can miss the mold entirely, run down the inside of your freezer, and eventually puddle on the floor.
What Are Those Weird Noises?
When your ice maker suddenly starts buzzing, grinding, or clicking, it's telling you exactly what's wrong—if you know how to listen. Each sound points to a different problem, and identifying it can make all the difference if you end up calling a repair service.
A loud buzzing or humming noise that happens when the ice maker should be filling with water is almost always a problem with the water inlet valve. That sound means the valve is trying to open to let water in but can't because it's clogged or failing.
On the other hand, a grinding or clicking sound during the harvest cycle usually points to the motor or gears. This can be caused by something as simple as a stray ice cube jamming the ejector arms, stopping them from sweeping the new ice into the bin. It could also be a sign of stripped gears or a dying motor.
Expert Insight: Don't just turn up the TV and ignore these sounds. A buzzing inlet valve can burn itself out completely, and a grinding motor can destroy the whole ice maker assembly. Your best bet is to turn the ice maker off until you can figure out what's going on.
It’s also worth noting that your refrigerator's style can impact its reliability. French door refrigerators, for example, have a failure rate that is a staggering 70% higher than their side-by-side counterparts. A huge number of those failures are directly related to the ice maker, often because the bottom-freezer design puts more strain on the parts responsible for getting ice up to the dispenser. You can dig into the findings on refrigerator reliability to learn more about why these popular models can be so troublesome.
When to Call an Appliance Pro in Allen, TX
There’s a certain satisfaction in fixing something yourself, but with modern appliances, there's a fine line between a successful DIY repair and making things much, much worse. Knowing when to put down the tools and call in a professional isn't admitting defeat—it's the smart move that can save you from bigger headaches, safety risks, and a lot of wasted money.
Let’s be honest, some repairs are just not weekend projects. Today's refrigerators are packed with sensitive electronics and complex components that require specialized diagnostic gear. If you've run through all the basic troubleshooting tricks and you're still staring at an empty ice bin, that’s a pretty clear sign the problem is buried deep in the machine's mechanics.
Red Flags That Signal It's Time for a Service Call
The most obvious sign is a problem that just won’t stay fixed. You thaw out a frozen water line, and it freezes right back up a week later. The ice maker sputters to life for a day, then quits again without any rhyme or reason. From what we see with homeowners in Frisco and Plano, these recurring glitches are often symptoms of a much bigger, failing part.
It’s time to pick up the phone when you run into these scenarios:
- You Suspect an Electrical Fault: If you’re dealing with anything that seems connected to the control board or internal wiring, stop. These parts are incredibly easy to fry, and you’re risking your safety by messing with them without proper training.
- The Water Inlet Valve Needs Replacing: While it might seem straightforward, this job involves shutting off your home's water and dealing with plumbing. One wrong move, and you could be looking at a serious leak and thousands in water damage.
- You Hear Loud, Unsettling Noises: I’m not talking about the gentle hum of the motor. Grinding, clanking, or buzzing that you can’t trace to a simple ice jam usually points to a failing motor or busted gears in the ice maker assembly. That’s a job for a pro.
The Hidden Complexity of Your Ice Maker
It's easy to underestimate the engineering that goes into a modern ice maker. They aren’t just simple freezing trays anymore. They're intricate systems with a symphony of sensors, thermostats, motors, and control boards that have to work in perfect harmony. Unfortunately, all that complexity makes them more fragile.
A fascinating engineering analysis of an ice maker's dispenser found that tiny design flaws—like a 2 mm gap and weak weld lines—were causing constant fractures. After a simple redesign to reinforce those weak spots, the new systems could handle over 75,000 cycles, which is well beyond a typical 10-year lifespan. It just goes to show how specialized knowledge is critical for a lasting repair.
Key Takeaway: If you've hit a troubleshooting wall, or the repair involves the electrical system or main water lines, it's time to call in an expert. A professional technician can pinpoint the real problem and prevent the cycle of failed fixes that could damage your appliance or your home.
Trying to tackle a complex repair without the right experience can quickly turn a small problem into a catastrophe. For reliable, same-day service that handles these advanced refrigerator ice maker problems, our team is here to help. You can learn more about scheduling an expert fridge repair in Allen TX and get your ice maker back in business.
A Few Common Ice Maker Questions We Hear in North Dallas
When your ice maker stops working, you've got questions. As appliance repair pros serving homeowners across Plano, Frisco, and McKinney, we've heard them all. Here are the straight-up answers to some of the most common issues we run into.
How Often Should I Really Replace My Refrigerator's Water Filter?
This is probably the number one question we get, and it’s a big one. The simple answer is: you should replace your water filter every six months. Don't put this off.
Sticking to that schedule is crucial for a couple of reasons. First, an old filter gets clogged with sediment, which chokes off the water flow to your ice maker. That’s when you start seeing tiny, hollow ice cubes—or no ice at all. Second, a fresh filter just gives you better-tasting ice and water, free from impurities. Most newer fridges have a little reminder light, so there's no excuse to forget!
Why Are My Ice Cubes Suddenly So Small or Hollow?
Seeing puny, cloudy, or hollow ice cubes is a dead giveaway that your ice maker isn't getting enough water. Nine times out of ten, the problem is one of two things, and you don't need a technician for either.
The most common culprit is a clogged water filter that's way past its expiration date. If you can't remember the last time you changed it, start there. The other possibility is a kinked water line behind the fridge. It's easy to accidentally pinch the supply line when pushing the refrigerator back against the wall, restricting water flow enough to cause those undersized cubes. It's always worth a quick look back there.
Is There a Way to Manually Reset My Ice Maker?
Absolutely. Resetting the ice maker is a fantastic first troubleshooting step, especially if it just stopped working out of the blue. It can often resolve minor electronic glitches.
How you do it depends on your model, but it's usually one of these simple actions:
- Look for a reset button. Some models have a small button you'll need to press and hold for a few seconds.
- Toggle the power switch. Many units have a simple on/off switch or feeler arm. Just flip it off, wait a minute, and turn it back on.
- Pull the plug. If you can't find a button or switch, the universal fix is to unplug the entire refrigerator for about five minutes. This forces a hard reset on the control board when you plug it back in.
Performing a reset forces the ice maker to run a full diagnostic harvest cycle. It’s a simple trick of the trade that can save you the cost of a service call.
How Cold Does My Freezer Need to Be for the Ice Maker to Work?
Freezer temperature is non-negotiable for a happy ice maker. You need to keep it dialed in between 0°F and 5°F (that’s -18°C to -15°C).
If your freezer gets warmer than 10°F, the ice maker's internal thermostat won't give the green light to start a new batch of ice. It’s a built-in safety measure to keep it from dumping a tray of slushy water into your ice bin. On the flip side, setting the freezer too cold can actually freeze the water fill line solid, creating an ice dam that stops production completely.
What Makes All My Ice Cubes Clump Into a Giant Block?
Waking up to a solid iceberg in your ice bin is frustrating, but it usually points to one of two things. Most often, it's just from infrequent use. The freezer’s defrost cycle causes very slight temperature swings, which can make the outer surface of the cubes melt just enough to refreeze together into one big clump.
The other, more mechanical cause is a leaky water inlet valve. If that valve doesn’t seal tightly after filling the ice mold, it can drip slowly into the bin, freezing all the cubes together. For our customers in Allen and McKinney, we usually suggest breaking up the ice and trying to use it more regularly first.
My Ice Maker Is Making a Lot of Noise. Is That Normal?
Some noise is perfectly normal. You should expect to hear the motor hum, the sound of water filling the tray, and the familiar crash of fresh ice hitting the bin.
What you don't want to hear are loud, unusual sounds. A loud buzzing or humming that won't quit often points to a failing water inlet valve that's straining to open. If you hear a repetitive grinding or clicking sound as it tries to dump the ice, the gears in the ejector assembly could be stripped or jammed. If you hear sounds like that, it's best to turn the ice maker off to avoid causing more serious damage.
When you've tried the basics and your ice maker still won't cooperate, it's time to call in a pro. For fast, reliable appliance repair across Allen, Plano, Frisco, McKinney, and Celina, you can trust the certified technicians at ThumbUp.Pro. We handle these exact problems every single day and can get your ice maker working again, usually in just one trip. Schedule your service online and save $20.