Staring at an empty ice bin when you were expecting a full one is always a letdown. But before you panic, I can tell you from years of experience that most of the time, the fix is surprisingly simple. You can often get things running again in minutes without a single tool.
Let's walk through the initial checks that solve the majority of "no ice" situations for homeowners in Allen, Plano, and Frisco.
What North Dallas Residents Should Check First
When an ice maker gives up the ghost, it’s easy to assume a major, expensive failure is looming. For our clients in Plano, Frisco, and McKinney, a working ice maker is non-negotiable for daily life. Before you even think about calling for a repair, there are a few basic diagnostics you should always perform.
Think of this as triage for your appliance. We're going to rule out the simple, common culprits first before digging deeper. This practical approach saves a ton of time and often solves the problem right then and there.
Confirm Power and Basic Settings
You'd be amazed how often the issue is something that was accidentally switched off. First thing's first: make sure the ice maker is actually turned on. Some have a toggle switch, while others have a power button on a control panel.
If your model has a metal wire (the control arm or feeler arm), check that it's in the down position. If it’s locked in the up position, the ice maker thinks the bin is full and won’t make any more ice. It’s an easy thing to bump when you’re grabbing ice.
Next, check your freezer's temperature. For the ice maker's cycle to run correctly, your freezer needs to be holding steady between 0°F and 5°F. If it's too warm, the thermostat on the ice maker won't trigger the harvest cycle. This can easily happen if the door was left cracked open or after a big grocery run.
Interpreting Sounds and Silence
The noises your ice maker makes—or doesn't make—are huge clues. If it’s completely silent, that almost always points back to a power issue. No power, no action.
But what if you hear a faint buzzing or humming sound for a few seconds every hour or so? That's typically the water valve trying to open to fill the ice mold. If no water flows, it usually means the water supply line is frozen or clogged. This is a common diagnostic trick, much like how strange noises can help you figure out why your Bosch dishwasher isn't cleaning properly.
Key Takeaway: Before you do anything else, check these three things: power switch is on, control arm is down, and the freezer temperature is 5°F or below. These simple checks resolve more than 50% of the ice maker service calls we get in the Allen and Plano area.
Ice makers are a big deal in the appliance world. The global market was valued at USD 5.3 billion in 2024, with North America accounting for over 37.8% of that demand. This just shows how much we rely on these machines, which is why it's so frustrating when they stop working.
To make things even easier, I've put together a quick checklist to help you systematically rule out the easy stuff.
Quick Diagnostic Checklist for McKinney Ice Maker Failures
This table is your starting point. Run through these common symptoms and potential fixes to see if you can spot the problem right away.
| Symptom | Potential Cause | Quick Fix To Try |
|---|---|---|
| No ice at all | Unit is off or paused | Check the power switch and control arm. |
| Hollow or small cubes | Low water pressure or clogged filter | Replace the water filter first. |
| Water leaking in freezer | Leaky water inlet valve | Inspect the valve at the back for drips. |
| Not ejecting ice | Ice is stuck in the mold | Gently try to remove stuck cubes with a plastic utensil. |
| Unit is completely silent | No power to the ice maker | Verify it's plugged in and the breaker hasn't tripped. |
Going through these steps helps isolate the issue. If you've tried these fixes and still have an empty ice bin, then it's time to move on to more advanced troubleshooting.
Taking a Closer Look at Your Water Supply Lines and Filters in Allen and Plano
If the simple checks didn't get your ice maker humming again, it's time to dig into the most common culprit: the water supply. Your ice maker is completely dependent on a steady, strong flow of water to do its job. I can tell you from experience, especially for folks in Allen and Celina, that about 9 times out of 10, a dead ice maker points back to a problem with the water getting to it.
This section is all about tracking down issues with the water line, the inlet valve, and the filter. But first, let’s talk safety. Before you even think about pulling the fridge out, always shut off the water supply. You'll usually find the shutoff valve under your kitchen sink or tucked away behind the refrigerator itself.
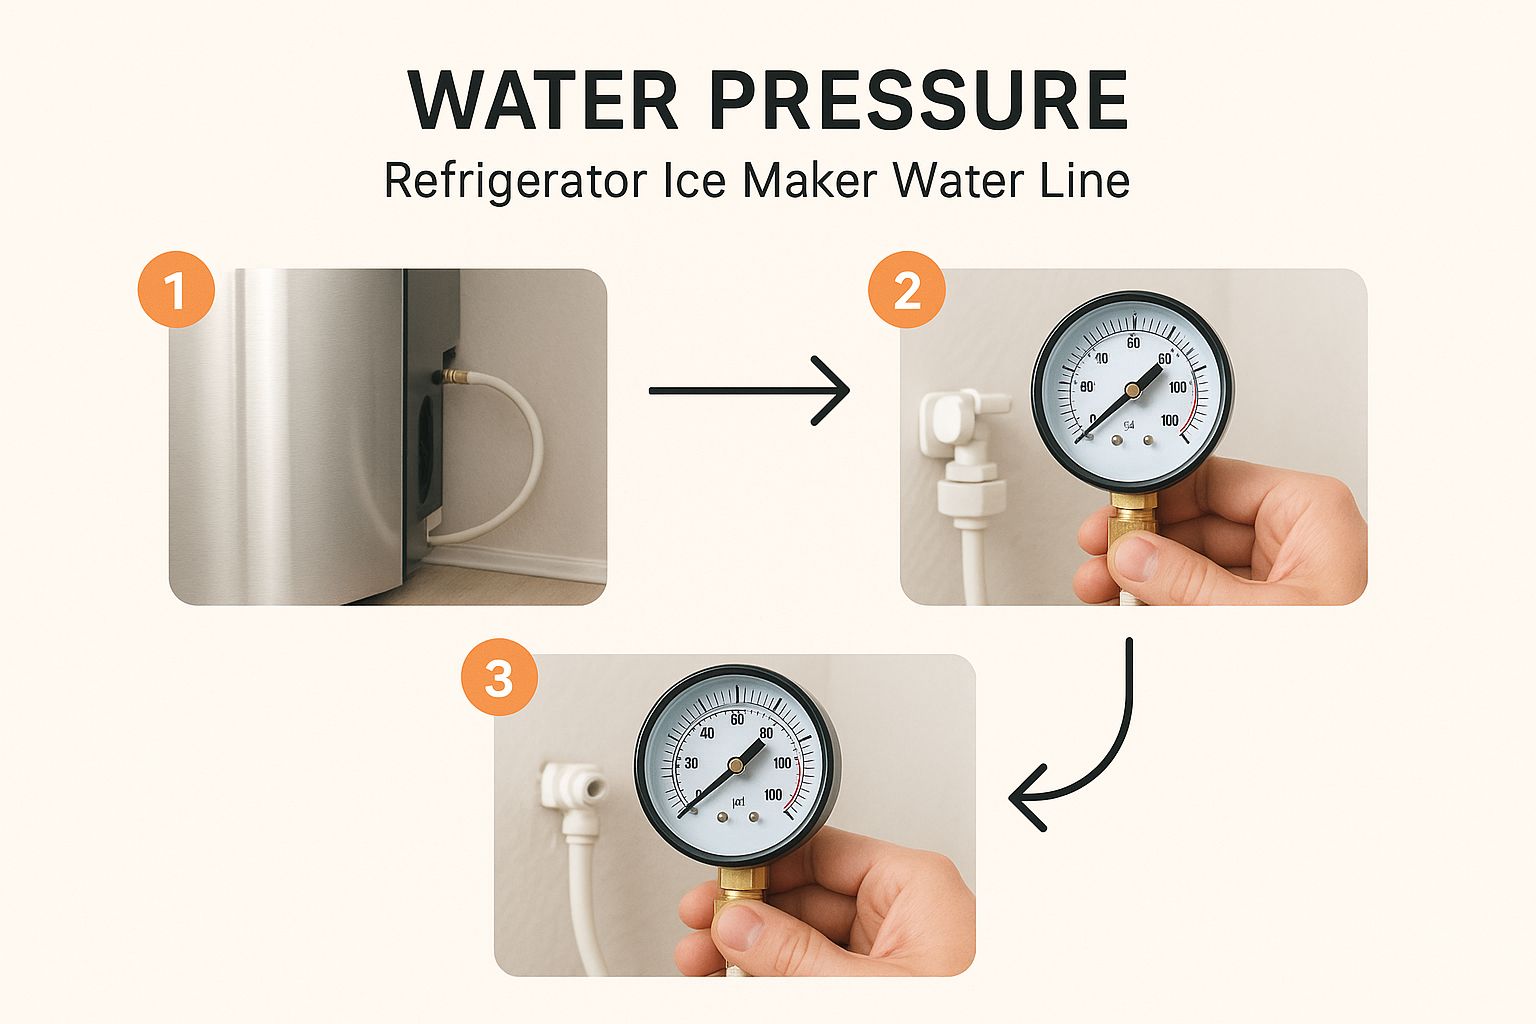
The image here shows a pro move—hooking up a pressure gauge. This is how we confirm whether we're dealing with low pressure from the house or if there’s a blockage somewhere in the fridge's own plumbing. It takes the guesswork right out of the equation.
Hunting for a Frozen or Kinked Water Line
That thin little water line feeding your ice maker is notorious for freezing up, particularly if your freezer is set to arctic temperatures. We see this a lot in the North Dallas area during those unexpected cold snaps. A frozen line is a complete showstopper.
Gently slide your refrigerator out from the wall and take a look at the plastic or copper tubing. If you spot any frost or the line feels rock-solid and icy, you've found your problem.
- The Fix: Grab a hairdryer and set it to low heat. Gently wave it back and forth along the frozen section. You're not trying to cook it, just warm it up. Eventually, you’ll hear the satisfying sound of water starting to flow again.
- The Warning: Whatever you do, don't use a heat gun or any kind of open flame. High, direct heat will melt the plastic tubing in a second, turning a simple fix into a flooded kitchen and a much more expensive repair.
While you're back there, check for any sharp kinks or bends in the line. A bad crimp can choke off the water flow just as effectively as a chunk of ice.
Is the Water Inlet Valve Working?
Think of the water inlet valve as the bouncer for your ice maker. It's a little electronic gate that opens for a few seconds to let just the right amount of water into the ice mold. When it’s working properly, you can usually hear a distinct 'click,' then a 'buzz' as the water flows in.
If you hear that sound but the ice mold is bone dry, it's a huge clue. It tells you the valve is getting the command to open, but something is blocking the water—likely a frozen line, a clog, or a seriously dirty filter.
On the other hand, if it's dead silent when it should be filling, the valve itself might have failed. An electrically dead valve will never open, and no water will ever get to the tray. Pinpointing a bad valve is a major diagnostic win, though replacing it is often a job best left for a professional.
Pro Tip for Plano Residents: Before you condemn the valve, check your water filter. I've seen severely clogged filters reduce water pressure so much that the valve can't open properly. It looks exactly like a failed valve, but it’s a much easier and cheaper fix.
The Most Common Fix: Replacing the Water Filter
A clogged water filter is, without a doubt, the number one reason for slow ice production, or worse, those frustrating little hollow cubes. Over time, the filter gets packed with minerals and sediment from the water, strangling the flow. It’s why most manufacturers insist you replace the filter every six months.
The home ice maker market was a USD 2.6 billion industry in 2024, yet so many service calls come down to basic maintenance like this. Even the smartest new appliances are still vulnerable to classic mechanical issues like clogged filters and frozen lines. If you're curious about the industry, you can explore the full research on ice maker technology.
Changing the filter is usually a quick job:
- First, find it. It could be inside the fridge compartment, down in the front grille, or behind a small pop-off panel.
- Most filters release with a simple push-button or a quarter-turn twist. Just follow the instructions on the housing.
- Pop the new one in and make sure it clicks or locks firmly into place.
- Finally, run a couple of gallons of water through the dispenser to prime the new filter and flush out any loose carbon dust.
Sorting Out Mechanical Jams and Electrical Hiccups in Frisco
Alright, so the water supply is good, but the ice maker itself is sitting there, doing absolutely nothing. When you get to this point, you can pretty much rule out plumbing issues. The culprit is almost certainly hiding within the ice-making machinery itself—that collection of gears, arms, and sensors responsible for freezing and harvesting the cubes.
This is where things start to feel a bit more technical, but don't be intimidated. Many of these mechanical problems are surprisingly simple to fix. We'll walk through how to spot and clear a basic jam, a frequent headache for homeowners I've helped in the Frisco and Plano areas.
Spotting and Clearing a Jam
Deep inside your ice maker, a set of "ejector arms" or "rakes" has one job: to push finished ice cubes out of the mold and into the bin. Every now and then, a cube gets stuck mid-journey, jamming the whole system and bringing production to a dead stop. It’s like a logjam—one stubborn piece halts everything behind it.
You're probably looking at a jam if you notice:
- The ejector arm is frozen in an awkward, half-rotated position.
- You can literally see a piece of ice wedged in the works.
- The ice maker groans, clicks, or grinds before giving up.
To get a good look, slide the ice bin out of the way. If you spot the rogue cube, you can usually nudge it free with a plastic spoon or spatula. Never use a metal tool, as you can easily gouge the ice mold's coating. A cloth soaked in warm water can also help melt a stubborn cube without much fuss.
The Pro Trick: Forcing a Manual Harvest Cycle
One of the best diagnostic tools in your arsenal is triggering a manual harvest cycle. This forces the ice maker through its entire sequence, letting you watch exactly where it gets stuck—or if it even responds at all. How you do this varies between models, but you're usually looking for a small button, a switch, or a set of test points on the front of the assembly.
This one test tells you so much. If the cycle kicks off but the arms don't budge, you've likely got a seized motor or a stripped gear. But if it runs through a perfect cycle? The problem might be intermittent or related to the internal thermostat that’s supposed to tell the unit when the ice is ready.
Safety First: Before you even think about testing electrical parts, unplug the entire refrigerator from the wall. Your safety is non-negotiable, and poking around live electrical components is a job strictly for the pros.
Modern appliances are packed with compact electrical and mechanical systems. Understanding how these parts are supposed to work together is key for any successful DIY repair. If you want to dive deeper into the market trends, you can find valuable insights into the ice maker market here.
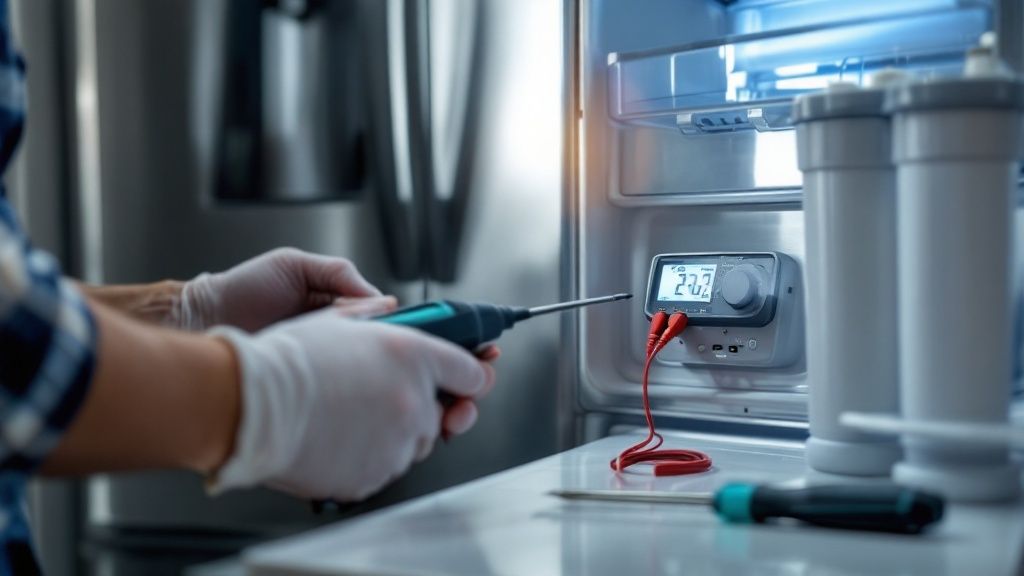
Using a Multimeter to Check for Electrical Faults
If there are no obvious jams, it's time to suspect an electrical issue. For the confident DIYer in McKinney or Celina, a simple multimeter is your best friend for diagnosing a lifeless ice maker. You’ll want to check two key components: the motor and the thermostat.
Testing the Motor
This little motor is what drives the ejector arms. After unplugging the fridge and getting access to the ice maker assembly, disconnect the motor’s wire harness. Set your multimeter to the ohms setting (Ω) and touch the probes to the motor's terminals. A healthy motor will show continuity, usually reading somewhere between 200 and 500 ohms. If you get an infinite reading (often displayed as "OL" for "open line"), the motor has burned out and needs to be replaced.
Testing the Thermostat
The bimetal thermostat is the brain of the operation, signaling the motor to start the harvest once the water is frozen solid. It's a small, round part clipped to the side of the ice mold. With your multimeter still on the ohms setting, test the thermostat while it's cold (below 15°F). It should show continuity (a reading near zero). If it shows no continuity when it’s cold, it has failed and can no longer trigger the harvest cycle.
If these tests point to a bad part, it's a good time to hit pause. While replacing these components is definitely a DIY-able job for some, it requires precision and patience. If you're feeling out of your depth, digging into other topics in appliance repair can provide further context and help you decide when to call in a professional.
Improving Ice Quality and Production Speed
https://www.youtube.com/embed/OWgZg8BD21o
Sometimes, your ice maker is technically working, but the ice it produces is just… disappointing. Maybe you're getting cloudy, hollow, or tiny cubes, or it feels like it takes all day to fill the bin. For our clients in McKinney and Frisco, these quality issues can be just as frustrating as a complete breakdown.
Let's move beyond a simple "on or off" diagnosis and dig into the details that separate a great ice maker from a mediocre one. Most of these problems come back to a few usual suspects: water pressure, freezer temperature, and basic cleanliness. Getting these right won't just solve your current headache; it'll keep your ice maker running smoothly for years.
Diagnosing Water Pressure and Its Impact
Inconsistent water pressure is the secret villain behind so many ice quality problems. When the pressure is too low, the ice maker's valve can't let in enough water during its very short fill cycle. The result is always a letdown.
Low water pressure is usually the culprit behind:
- Hollow or Small Cubes: The ice mold never fills completely, leaving you with thin, undersized cubes that melt almost instantly in your drink.
- Slow Production: When the mold doesn't fill properly, it can throw off the timing of the freezing cycle, dramatically slowing down how quickly you get a full bin of ice.
Your first move should be checking the water filter. I've seen countless cases where a clogged filter, long past its replacement date, was the only thing restricting water flow. If a new filter doesn't do the trick, you might have a partially frozen water line or a nasty kink in the tubing behind your fridge.
Why Your Freezer Temperature Is So Critical
The temperature inside your freezer does more than just keep your food frozen—it directly controls the speed and quality of your ice. An ice maker has its own little thermostat that's set to trigger the harvest cycle only when the water hits a specific temperature, usually around 15°F.
If your freezer is set too warm (anything above 5°F), the ice maker will take forever to reach that trigger point. This means fewer harvest cycles throughout the day and a painfully slow refill rate for your ice bin.
But setting it too cold can cause problems, too. Extreme cold can make the ice maker's plastic parts brittle. I've also seen it make the ice so hard that the ejector mechanism struggles to push the cubes out, leading to jams. The sweet spot is almost always right between 0°F and 5°F.
Pro Tip for McKinney Homeowners: After you adjust your freezer's temperature, you have to give it a full 24 hours to stabilize before you'll see any real change in ice production. The system needs time to catch up.
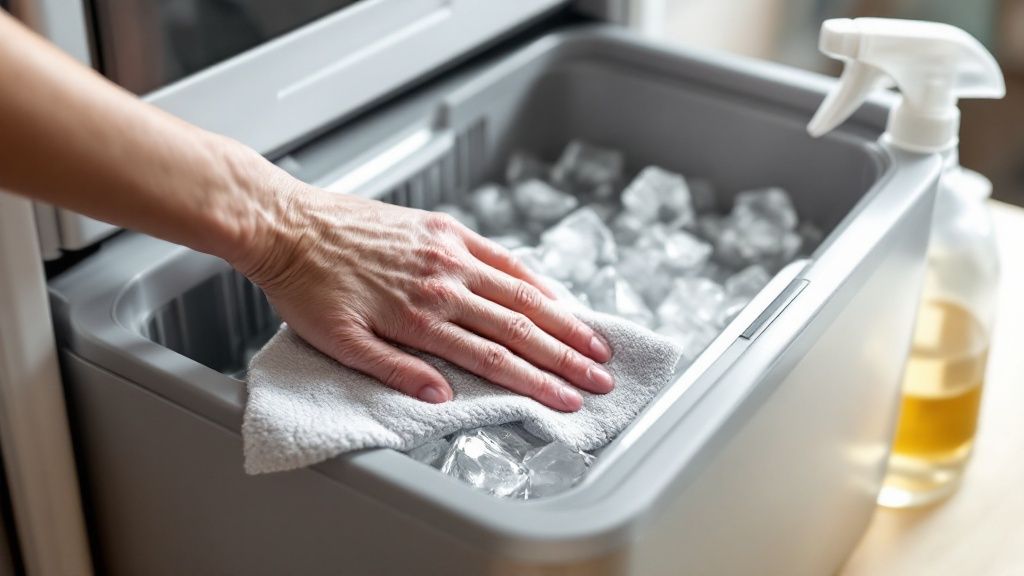
The Best Defense Is Good Maintenance
You can head off most of these quality-related ice maker problems with a simple, consistent maintenance routine. Just like any other appliance, a little preventative care makes a huge difference. This is especially true when it comes to that "freezer taste" or cloudy ice, a common complaint we get from homeowners in Plano.
Bad-tasting ice is almost always caused by one of two things: an old water filter that's stopped doing its job, or food odors that have crept into the ice from inside your freezer.
To keep your ice fresh and your machine happy, just focus on these two things:
- Change Your Water Filter: Make this a non-negotiable task every six months. That filter is your only line of defense against the minerals, chlorine, and other contaminants in the water supply that make ice taste funky.
- Clean the Bin and Mold: Every few months, pull out the ice bin and give it a good wash with warm, soapy water. While it’s out, use a cloth with a simple solution of water and vinegar to gently wipe down the ice mold. This will clear out any mineral buildup that's accumulated.
By paying attention to these details, you can solve many of the nagging issues that plague a "working" ice maker. This table breaks down what I see most often in the field.
Ice Quality Problem And Solution
When your ice quality is off, it’s usually a clear sign pointing to a specific problem. Use this chart to quickly connect the symptom to the likely cause and its solution.
| Ice Problem | Likely Cause | Recommended Solution |
|---|---|---|
| Cloudy or White Ice | Dissolved air and minerals in the water. | This is very common. Installing an external inline filter can sometimes help, but it's often normal for household ice makers. |
| Bad Tasting Ice | Old water filter or food odors in the freezer. | Replace the water filter and clean the freezer interior. Store strong-smelling foods like onions or fish in airtight containers. |
| Small or Hollow Cubes | Low water pressure from a clogged filter or kinked line. | First, replace the water filter. If that fails, check the water line behind the fridge for kinks or ice blockages. |
| Slow Ice Production | Freezer temperature is too warm (above 5°F). | Adjust the freezer temperature to 0°F and wait 24 hours for the ice maker cycle to regulate. |
Taking these small steps often resolves the issue, restoring both your ice quality and your peace of mind.
When to Call a Professional in North Dallas, Frisco, and Plano
There's a great sense of accomplishment in fixing something yourself, but knowing when to step back is probably the most important skill in DIY appliance repair. For every simple fix, there's a complex problem lurking that needs special tools, real expertise, and a healthy respect for safety. Pushing your luck can quickly turn a small problem into an expensive disaster.
This is where we draw the line. If you're in Plano or Frisco and you see any of these red flags, it's time to put the tools down and call a pro. Making that call isn't giving up; it's the smart move that protects you, your home, and your bank account.
Serious Safety Hazards You Cannot Ignore
Some problems are more than just a broken part—they're giant, waving warning signs. If you encounter any of these, your DIY journey is over. It's time to call for help immediately.
The biggest one is the smell of refrigerant. It's a distinct, faintly sweet chemical or ammonia-like odor. If you smell that or see an oily residue on the floor behind the fridge, you've got a leak in the sealed refrigerant system. This is non-negotiable. You can't fix this yourself. Handling refrigerant legally and safely requires an EPA license and specialized recovery equipment.
Electrical problems are the other major red flag. Stop what you're doing if you see:
- Sparks coming from the outlet or plug.
- The smell of burning plastic or hot wires.
- The circuit breaker tripping the second you plug the fridge back in.
These aren't simple wiring issues; they point to a serious electrical fault. Messing with this stuff is a genuine fire risk.
When the Repair Is Just Too Complex
Beyond the immediate dangers, some jobs are just too mechanically tricky for a weekend project. You might have nailed the diagnosis, but that's only half the battle. Executing the repair without the right tools or experience can be a whole other challenge.
For example, swapping out the main control board sounds straightforward, but it means disconnecting a dozen tiny wire harnesses in a specific sequence. One mistake and you could fry the brand-new board or another expensive component. Even replacing the entire ice maker assembly can be a nightmare of hidden screws and brittle plastic clips that love to snap.
Our Experience in Frisco: We get a lot of calls from folks who tried to do it themselves. A common one is correctly identifying a bad motor but then struggling with the installation, stripping the gears, or misaligning the unit. Honestly, sometimes the cheapest and fastest route is just letting an expert handle it from the get-go.
Doing the Math: Cost vs. Benefit
Finally, let's talk about the practical side. Before you start ordering parts online, do a quick gut check on the cost. A new ice maker assembly alone can run you $150 to $250, sometimes more. If you buy it and the fix doesn't work, you've just thrown that money away and you're right back where you started.
When you add up the price of parts, the hours you'll spend on it, and the real risk of making things worse, calling a pro often makes the most sense. A good technician gives you a solid diagnosis and a clear quote, so you know the job will be done right the first time. If you're in Allen and staring down a complicated repair, getting some expert advice on your fridge repair can save you significant time and stress.
Common Ice Maker Questions From Allen and McKinney Homeowners
We spend our days in homes all over North Dallas, from Celina down to Plano, and we've noticed a few questions about ice makers pop up again and again. People just want straight answers, not a bunch of technical jargon. So, here are the most common things we get asked and the real-world advice our techs share on the job.
This isn't just about getting the machine working again; it’s about understanding what went wrong and how to prevent it from happening again.
Why Did My Ice Maker Suddenly Stop Working?
This is, without a doubt, the number one question we hear. It usually comes from a homeowner in Allen getting ready for a family cookout. The good news? When an ice maker just stops cold, it's rarely a catastrophic failure. More often than not, it's something simple that was overlooked.
Most sudden stops trace back to one of three culprits:
- The control arm is flipped up. Someone reaches in for ice and accidentally bumps the metal feeler arm into the 'off' position. This tells the ice maker the bin is full, so it stops production.
- It needs a quick power cycle. A brief power surge or flicker can scramble the ice maker's simple electronics. Try unplugging the whole refrigerator for five minutes. This simple reset often does the trick.
- A single cube is jammed. It sounds too simple to be true, but one rogue ice cube can get stuck in the ejector mechanism during a harvest cycle, bringing the whole operation to a standstill.
Before you start worrying about a big repair bill, always run through these quick checks. It’s the same advice we give for any appliance problem, whether it's a dead ice maker or a leaky washing machine.
How Often Should I Replace the Water Filter?
This is a fantastic question because it gets right to the heart of good maintenance. The manufacturer’s guideline is usually every six months, and we can't stress enough how important it is to stick to that. A clogged filter is the root cause of so many problems we see in Frisco and McKinney.
Think of that filter as the lungs of your ice maker. Over time, it gets gunked up with minerals and sediment from the local water supply. This restricts water flow, which leads directly to those small, hollow, or cloudy cubes and painfully slow ice production.
A fresh filter doesn't just improve your ice maker's speed and quality; it makes your ice taste clean. If you've ever noticed a "freezer taste," an old, expired filter is almost always to blame.
Can I Use My Ice Maker Without a Filter?
Technically, yes. Some refrigerators come with a little bypass plug that lets you run the system without a filter. But honestly, we almost never recommend it, especially in places like North Dallas where hard water is common.
Running filter-free means all those minerals and tiny bits of sediment in your water go straight into your ice maker's internal parts. This gunk builds up on sensitive components like the water inlet valve, causing it to stick or fail completely. The $50 you save on a filter can easily turn into a $250 repair bill later on.
Is It Worth Repairing an Old Ice Maker?
This is a cost-benefit question we help homeowners navigate every single day. The right answer really boils down to two things: the age of your refrigerator and the specific repair needed.
If your fridge is pushing 10-12 years old and the ice maker needs a major, expensive part (like the main control module or the entire assembly), it might be time to think about the appliance’s overall lifespan. Pouring a few hundred dollars into an aging refrigerator often isn't the best financial move.
On the other hand, if it’s a more common fix—like a bad motor or a faulty water inlet valve—it is absolutely worth repairing. These jobs are far cheaper than buying a whole new refrigerator and can easily add several more years of reliable service to your appliance. A good technician will always lay out the costs clearly so you can make a smart decision.
When a simple fix isn't enough, you need reliable experts who know your neighborhood. ThumbUp.Pro provides fast, professional appliance repair across Allen, Plano, Frisco, McKinney, and the greater North Dallas area. Our certified technicians have the experience to diagnose the problem correctly and get it fixed right the first time. For a clear estimate and service you can trust, book your appointment at https://thumbup.pro and save $20.
Article created using Outrank